
Keeping up with monthly bills can feel harder than it should. Even when you know what is due, it is easy for expenses to start blending together, especially when some bills stay the same every month and others seem to change all the time. One month the electric bill is manageable; the next it jumps. Groceries, gas, water, and similar costs can shift just enough to make the whole month feel less predictable.
That is one reason a simple bill tracker can be so helpful.
In Apple Numbers, you can build a bill tracker that does more than list due dates and amounts. You can use it to separate fixed monthly costs from adjustable monthly costs, which gives you a much clearer view of your money. Fixed monthly costs are the bills that usually stay the same, like rent, a car payment, or a subscription. Adjustable monthly costs are the ones that can rise or fall, like electricity, groceries, or gas. When you track them separately, it becomes easier to see which parts of your budget are stable and which ones need a little more attention.
In this guide, you will learn how to create a bill tracker in Apple Numbers that helps you organize your monthly bills, track what has been paid, and better understand the difference between predictable and changing expenses. By the end, you will have a simple system you can use each month, along with a free template to help you get started faster.
What a Bill Tracker Should Include
A good bill tracker does not need to be complicated, but it should include enough information to help you stay organized and make better decisions each month. The goal is not just to create a list of bills. The goal is to build a simple system you can actually use.
At a minimum, your bill tracker in Apple Numbers should include:
- bill name
- due date
- amount due
- autopay or manual pay
- paid status
- category
- notes
- bill type, fixed or adjustable
Each field has a purpose. The bill name tells you what the expense is. The due date helps you plan ahead. The amount due tells you what needs to be paid. Autopay or manual pay shows whether you need to take action yourself. Paid status helps you avoid confusion once bills start getting paid throughout the month. Categories help group similar expenses together. Notes give you space for reminders or special details. Finally, bill type helps you separate expenses that stay mostly the same from the ones that tend to change.
That last field is especially helpful because it turns your tracker into more than a payment checklist. It gives you a clearer view of how your monthly expenses are structured.
In the next section, we will look more closely at the difference between fixed monthly costs and adjustable monthly costs, and why that distinction makes this kind of tracker much more useful.
Fixed Monthly Costs vs Adjustable Monthly Costs
One of the most useful parts of this bill tracker is the ability to separate your bills into two groups: fixed monthly costs and adjustable monthly costs.
This may seem like a small detail, but it can make a big difference in how clearly you understand your monthly finances.
What Are Fixed Monthly Costs?
Fixed monthly costs are the bills that usually stay the same from month to month. These are the expenses you can generally count on being predictable.
Common examples include:
- rent or mortgage
- car payment
- insurance premiums
- streaming subscriptions
- internet service, if it stays the same each month
Because these bills are more stable, they are often the easiest part of your monthly expenses to plan around. Once you know what your fixed costs are, you have a stronger starting point for the rest of your budget.
What Are Adjustable Monthly Costs?
Adjustable monthly costs are the bills that can change from month to month. Sometimes the change is small, and sometimes it is enough to affect the rest of your spending.
Common examples include:
- electricity
- water
- gas
- groceries
- phone bill, if usage or fees vary
These are the expenses that often create more uncertainty. Even when you know they are coming, you may not know the exact amount until the bill arrives or the month is nearly over.
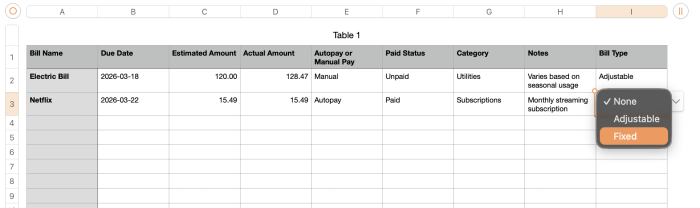
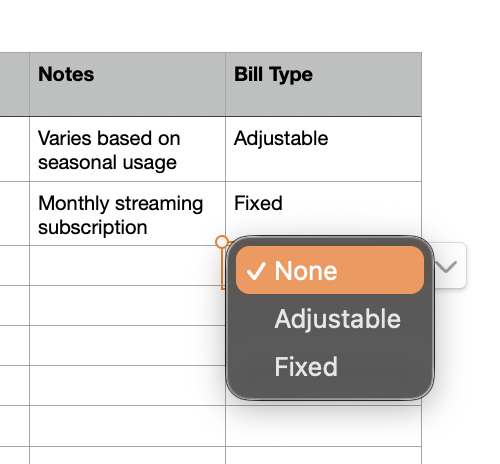
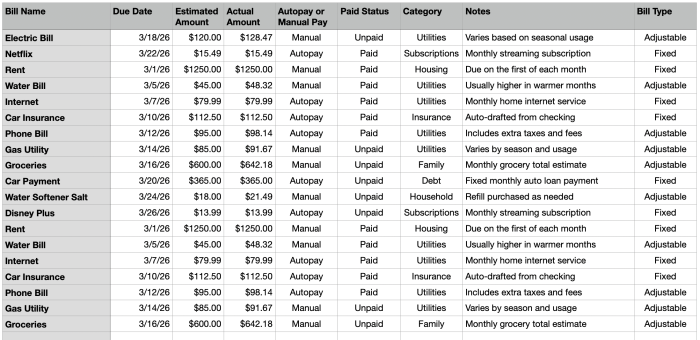
[Screenshot Placeholder: Close-up of the Bill Type column showing Electric Bill marked Adjustable and Netflix marked Fixed]
Why This Distinction Matters
When you track all your bills together without any type of separation, everything can start to look the same. But not every bill behaves the same way.
By marking each bill as either fixed or adjustable, you can start to answer more useful questions, such as:
- How much of my monthly spending is predictable?
- Which bills tend to move up and down?
- Which part of my month needs more cushion or flexibility?
This matters because adjustable bills often create more pressure on a monthly budget. If your fixed costs are already high, even a few changing utility or grocery bills can make the month feel tight. On the other hand, if you know most of your costs are fixed, planning ahead becomes easier.
A Simple Example
Take these two bills:
- Netflix is a fixed monthly cost because the amount is usually the same each month.
- Electric Bill is an adjustable monthly cost because the amount can change based on weather, usage, and time of year.
Putting both in the same tracker is helpful, but labeling them by type makes the tracker much more useful. You are no longer just listing what you owe. You are starting to understand the shape of your monthly obligations.
How This Helps with Budgeting
This distinction also makes it easier to connect your bill tracker to a larger budget.
Your fixed monthly costs help define the part of your budget that is more stable and non-negotiable. Your adjustable monthly costs show where monthly variation is likely to happen. That does not always mean those costs are easy to reduce, but it does mean they deserve a little more attention.
For example, if your electric bill is much higher than expected one month, that is useful information. If a subscription quietly adds up over time, that is useful too. Separating fixed and adjustable bills helps those patterns stand out faster.
What to Do in Your Bill Tracker
As you build your table in Apple Numbers, add a Bill Type column and label each bill as either:
- Fixed
- Adjustable
That one column gives your tracker more depth without making it more complicated. Later, you can even total your fixed and adjustable bills separately to get a better view of your month.
In the next section, we will walk through how to set up the bill tracker in Apple Numbers so you can start entering your own monthly bills.
How to Set Up the Bill Tracker in Apple Numbers
Now that you know what information to include, it is time to build the tracker in Apple Numbers.
The good news is that this does not need to be complicated. You are creating one main table with a few helpful columns, then formatting it so it is easy to update each month.
Step 1: Create a New Spreadsheet
Open Apple Numbers and start with a blank spreadsheet. You can choose a simple blank template so you have full control over the layout.
Rename the sheet something clear, such as Monthly Bill Tracker.
This will give you a clean place to build your table without extra formatting getting in the way.
Step 2: Add Your Column Headings
In the first row of your table, add the main headings for your tracker.
Use these columns:
- Bill Name
- Due Date
- Estimated Amount
- Actual Amount
- Autopay or Manual Pay
- Paid Status
- Category
- Notes
- Bill Type
These headings give you a good mix of planning, tracking, and organization. They also support the fixed versus adjustable distinction that makes this tracker more useful than a basic list.

Step 3: Enter a Few Sample Bills
Before formatting everything, enter a few example rows so you can see how the tracker will work.
For example, you might enter:
- Electric Bill as an adjustable expense
- Netflix as a fixed expense
- Rent as a fixed expense
- Water Bill as an adjustable expense
This helps you test the layout and makes it easier to see what needs to be widened, resized, or reformatted.
Step 4: Format the Due Date Column
Click the Due Date column and set it to a date format in the Format sidebar. This will make your due dates easier to read and sort.
Using a consistent date format also makes the tracker feel cleaner and more professional.
Step 5: Format the Amount Columns
Next, select the Estimated Amount and Actual Amount columns and format them as currency.
This is especially helpful for adjustable bills because it lets you compare what you expected to pay with what you actually paid.
For example:
- your Electric Bill might be estimated at $120
- the actual amount might end up being $128.47
That kind of side-by-side comparison gives you better insight over time.
[Screenshot Placeholder: Close-up of Estimated Amount and Actual Amount columns formatted as currency]
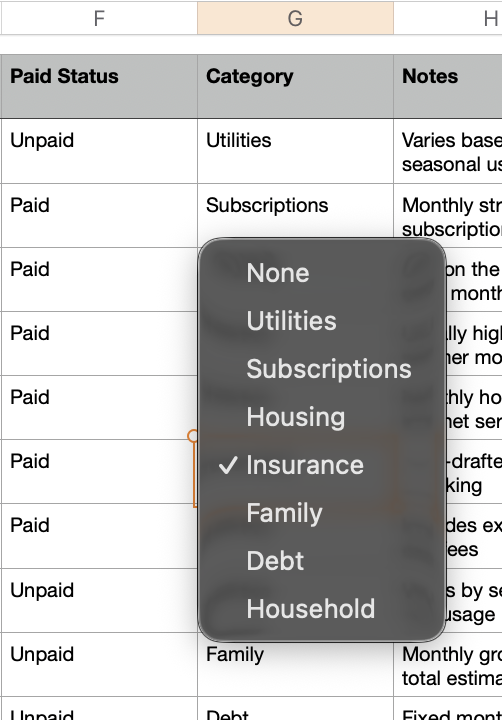
Step 6: Use Pop-Up Menus for Repeating Fields
For columns that will repeat the same types of values, use pop-up menus. This makes the spreadsheet easier to use and helps keep entries consistent.
The most useful columns for pop-up menus are:
- Autopay or Manual Pay
- Autopay
- Manual
- Paid Status
- Paid
- Unpaid
- Bill Type
- Fixed
- Adjustable
- Category
- Housing
- Utilities
- Insurance
- Debt
- Subscriptions
- Family
- Transportation
- Other
Using pop-up menus means you can choose values quickly without retyping them each time.
Step 7: Adjust the Table So It Is Easy to Read
Once the basic data is in place, take a minute to make the tracker easier to scan.
A few simple formatting improvements can help a lot:
- widen the Bill Name and Notes columns
- keep amount columns narrow but readable
- make the header row bold
- freeze the header row if needed
- align currency values consistently
This is especially important if you plan to use screenshots from the template in your blog post or on Pinterest.
Step 8: Keep the Notes Column Practical
The Notes column is where you can add useful reminders that do not fit anywhere else.
You might use it for things like:
- varies by season
- due on the first business day
- includes extra fees
- pay from checking account
- review this subscription in June
These small notes can make your tracker much more helpful when you come back to it later.
Step 9: Review the Bill Type Column Carefully
Before moving on, look over your Bill Type column and make sure each bill is labeled correctly as either Fixed or Adjustable.
This is one of the most important parts of the tracker because it gives structure to the rest of your bill list.
Ask yourself:
- Does this amount usually stay the same each month?
- Or does it rise and fall depending on usage, timing, or season?
A streaming subscription like Netflix will usually be Fixed. An Electric Bill will usually be Adjustable.
Step 10: Save This as Your Base Monthly Tracker
Once your table looks good, save it as your main bill tracker file.
From there, you can either:
- reuse the same sheet month after month
- duplicate the sheet each month and update the new copy
- expand it later with summary boxes and totals
At this point, you already have a functional bill tracker in Apple Numbers.
In the next section, we will make it even more useful by adding summary totals for fixed monthly costs, adjustable monthly costs, paid bills, and unpaid bills.
Add Summaries to Make the Tracker More Useful
Once your main bill table is set up, the next step is to add a few summary totals. This is where your bill tracker starts becoming more than a list of payments. It becomes a tool that helps you understand your month.
A good summary area should help you answer questions quickly, such as:
- How much of my month is made up of fixed bills?
- How much is tied to adjustable bills?
- How much have I already paid?
- How much is still unpaid?
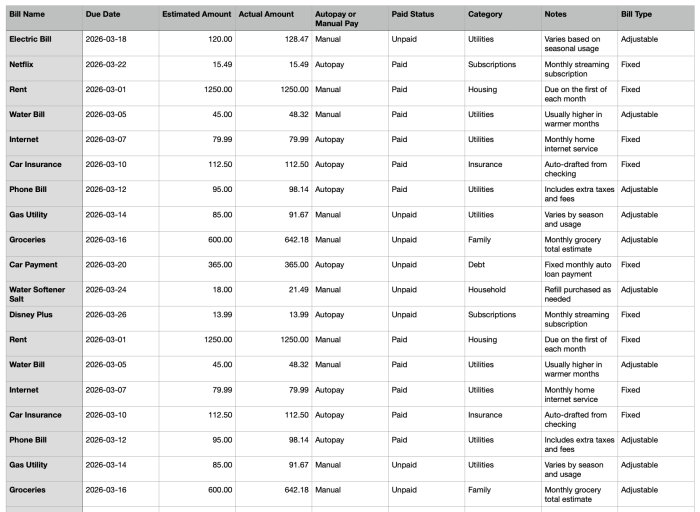
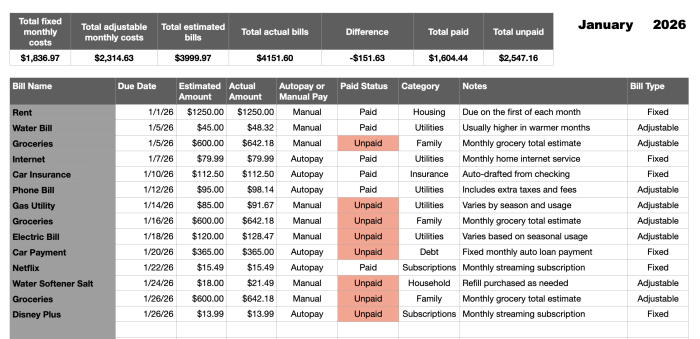
[Screenshot Placeholder: Full Bill Tracker with summary boxes above the main table]
What Summary Totals to Add
For this bill tracker, the most useful summary boxes are:
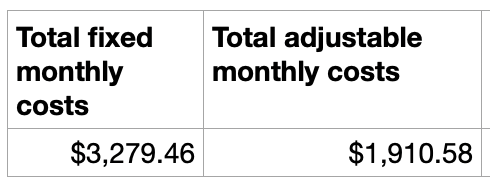
- Total fixed monthly costs
- Total adjustable monthly costs
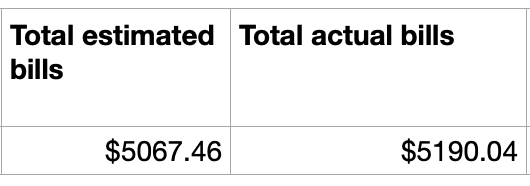
- Total estimated bills
- Total actual bills
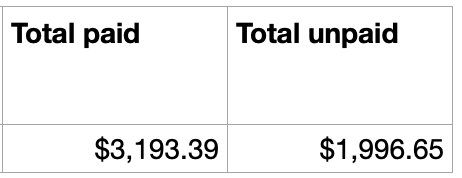
- Total paid
- Total unpaid
These six totals give you a quick financial snapshot without making the spreadsheet feel too busy.

Why Fixed and Adjustable Totals Matter
This is where the bill type column becomes especially useful.
When you total your fixed monthly costs, you can quickly see the part of your month that is mostly predictable. These are the bills that usually stay the same and are often the hardest to change in the short term. Here is the formula I used in my summary table for fixed monthly costs total. This formula checks all the rows that have been labelled, "Fixed". If you've labelled your columns the same way you can copy and paste these formulas into the correct cells.
=SUMIF(Bill Type,"Fixed",Actual Amount)When you total your adjustable monthly costs, you get a better view of the expenses that can move up or down. These are often the bills that create surprises, especially with utilities, groceries, or usage-based services. Here is the formula for the Adjustable summary.
=SUMIF(Bill Type,"Adjustable",Actual Amount)Seeing those two totals separately can help you think more clearly about cash flow. It shows you how much of your monthly bill load is steady and how much may need a little extra room.
To test that your formulas are working correctly change a few of your sample bills back and forth from fixed to adjustable. You should see both of these totals change accordingly.
Estimated Totals vs Actual Totals
If you are using both an Estimated Amount column and an Actual Amount column, your summary area becomes even more helpful.
The estimated total helps you plan at the start of the month. The actual total shows what really happened. Here are the formulas for you to copy:
=SUM(Estimated Amount)=SUM(Actual Amount)That comparison is especially helpful for adjustable bills. For example, your estimated electric bill might be lower than the actual amount, or your grocery total might come in higher than expected. Over time, this gives you a better idea of what to expect.
A simple summary of estimated bills versus actual bills can help you spot patterns without needing a full budget dashboard.
Paid vs Unpaid Totals
The paid and unpaid totals help answer one of the most practical questions in the tracker: what still needs attention?
If you total up what has already been paid, you get a quick sense of progress for the month. If you total what is still unpaid, you can immediately see what remains on your list. These formulas are similar to the paid and adjustable amount totals.
=SUMIF(Paid Status,"Paid",Actual Amount)=SUMIF(Paid Status,"Unpaid",Actual Amount)This is especially helpful later in the month, when some bills are taken care of and others are still coming due.
Where to Put the Summary Area
The easiest place to add your summary boxes is above the main bill table. That way, the totals are the first thing you see when you open the spreadsheet.
Keep the layout simple. Each total can have:
- a short label
- one formula cell
- clear currency formatting
Try to leave a little space between each box so the summary area feels clean and easy to scan.
Keep the Design Clean
This summary section will probably be one of the most useful screenshot areas for your blog post and for Pinterest graphics, so it is worth keeping it neat.
A few simple ideas:
- use bold labels
- keep the boxes evenly spaced
- format the totals as currency
- use subtle highlighting or fill color if desired
- avoid too many extra colors or distractions
The goal is to make the information easy to understand at a glance.
What This Adds to the Tracker
Without summaries, your tracker is still useful, but you have to read through the rows to understand what is going on.
With summaries, you can open the sheet and immediately see:
- your predictable monthly costs
- your changing monthly costs
- how much you planned to pay
- how much you actually paid
- what is already done
- what still needs attention
That is a big improvement from a simple bill checklist.

In the next section, we will look at a few optional upgrades you can add in Apple Numbers, including conditional highlighting, monthly duplicates, and ways to connect your bill tracker to a simple budget sheet.
Optional Upgrades for Your Bill Tracker
Once your basic bill tracker is working, you can stop there and still have a very useful tool. But if you want to make it even more practical in Apple Numbers, there are a few simple upgrades worth adding.
These are not required, but they can make the tracker easier to read, easier to reuse, and more connected to the rest of your personal finance system.
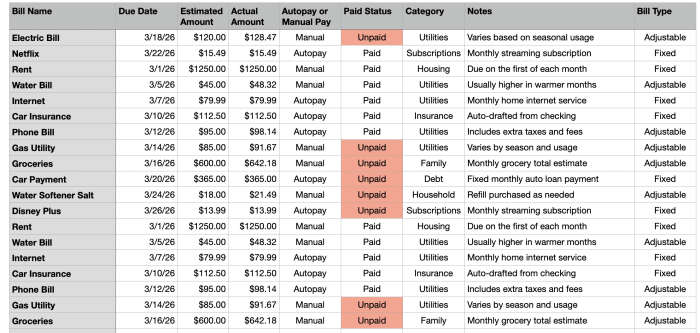
Use Conditional Highlighting for Unpaid Bills
One of the easiest upgrades is conditional highlighting.
This helps important rows stand out automatically, especially when a bill is still unpaid or has not been reviewed yet. Instead of scanning every line manually, you can let Numbers draw your attention to the bills that still need action.
A simple way to do this is to apply conditional highlighting to the Paid Status column or to the full row based on whether the bill is marked Unpaid.
For example, you might:
- highlight unpaid bills with a light red fill
- leave paid bills with no fill
- optionally use a different style for autopay bills if you want to review them separately
This makes the tracker much easier to scan during a busy month.
Duplicate the Sheet for Each Month
Another useful upgrade is creating a new version of the sheet each month.
Instead of clearing the same tracker over and over again, duplicate the sheet and rename it for each month, such as:
- January 2026
- February 2026
- March 2026
This gives you a running history of your bills over time. It also makes it easier to compare adjustable costs from month to month, especially for utilities, groceries, or other expenses that tend to change.
If you use this approach, your tracker becomes more than a monthly checklist. It becomes a simple record of your household bill history.
[Screenshot Placeholder: Sheet tabs or sheet list showing multiple monthly bill tracker copies]
Compare Estimated Amounts to Actual Amounts
If you are already using both an Estimated Amount column and an Actual Amount column, you can make the tracker even more helpful by actively comparing the two.
This does not need to be complicated. Even just scanning for bills where the actual amount is noticeably higher than the estimate can help you spot patterns.
This is especially useful for:
- electricity
- gas
- water
- groceries
- other variable household expenses
Over time, this can help you set more realistic monthly expectations.
Add a Notes Habit That Helps You Later
The Notes column becomes more valuable when you use it consistently.
For example, you might leave short notes like:
- higher in winter
- due before the 15th
- watch for annual rate increase
- cancel if no longer using
- usually lower in summer
These small reminders can make future months easier because you are not starting from scratch every time you open the spreadsheet.
Connect the Bill Tracker to a Simple Budget Sheet
One of the best long-term upgrades is connecting your bill tracker to a budget sheet.
Your bill tracker is focused on recurring obligations. Your budget gives you the larger picture. When the two work together, you get a much clearer understanding of your month.
For example:
- the bill tracker helps you see what must be paid
- the budget helps you see how those bills fit into your full spending plan
- fixed and adjustable bill totals can help guide how much room you leave in your budget
You do not need to build a full finance dashboard right away. Even just using your bill tracker alongside a simple budget template is a major step forward.
Review Subscriptions and Recurring Charges
Your bill tracker can also help you notice recurring charges that have become easy to ignore.
This is especially useful for subscription-style bills, such as:
- streaming services
- apps
- memberships
- software subscriptions
When these appear in the same place every month, it becomes much easier to ask whether each one is still worth keeping.
That small review habit can make the tracker useful for decision-making, not just record-keeping.
Keep It Simple Enough to Use
The most important upgrade is not adding more features. It is keeping the tracker simple enough that you will actually keep using it.
A spreadsheet that is easy to update every month is more helpful than a complicated one that feels like work. Start with the basic setup, add one or two upgrades that fit the way you manage money, and let the tracker grow with you over time.
In the next section, you can download the free Bill Tracker for Apple Numbers and use it as your starting point instead of building everything from scratch.
Download the Free Bill Tracker for Apple Numbers
If you want to skip the setup process and start with a ready-made version, you can download the free Bill Tracker for Apple Numbers and customize it for your own monthly bills.
This template is designed to help you:
- list all of your recurring bills in one place
- track due dates and payment status
- separate fixed monthly costs from adjustable monthly costs
- compare estimated amounts with actual amounts
- see summary totals for what is paid, unpaid, fixed, and adjustable
Whether you are trying to stay ahead of due dates, understand where your money goes each month, or simply feel a little more organized, this template gives you a practical starting point.
Once you download it, start by entering your most important monthly bills first. Add the basics, such as housing, utilities, insurance, subscriptions, and debt payments, then fill in the variable expenses that tend to change from month to month.
I designed it to start at any date just adjust the first sheet's month's cell to the correct date.
You do not need to make it perfect on day one. The goal is to build a simple system you can keep using.
If you want to make the tracker even more useful, pair it with a basic budget sheet or savings tracker so you can see how your monthly bills fit into your larger financial picture.
Conclusion
A bill tracker may seem like a small thing, but it can make a big difference in how you manage your month.
When you can clearly see what is due, what has been paid, and which expenses are fixed versus adjustable, it becomes much easier to stay organized and make better decisions. Instead of reacting to bills as they show up, you start to get a clearer picture of how your monthly obligations actually work.
Apple Numbers is a great tool for this because it gives you enough flexibility to build a tracker that is simple, useful, and easy to update over time.
Start with the free Bill Tracker template, make a few changes to fit your own bills, and use it as the foundation for a more organized monthly money routine.
From here, a good next step is to connect your bill tracker to a simple budget, savings tracker, or debt payoff plan so you can keep building a personal finance system that works on your Mac.
 iWorkCommunity
0 Comments